
Record a repeatable dimensional baseline before requesting a chain replacement.
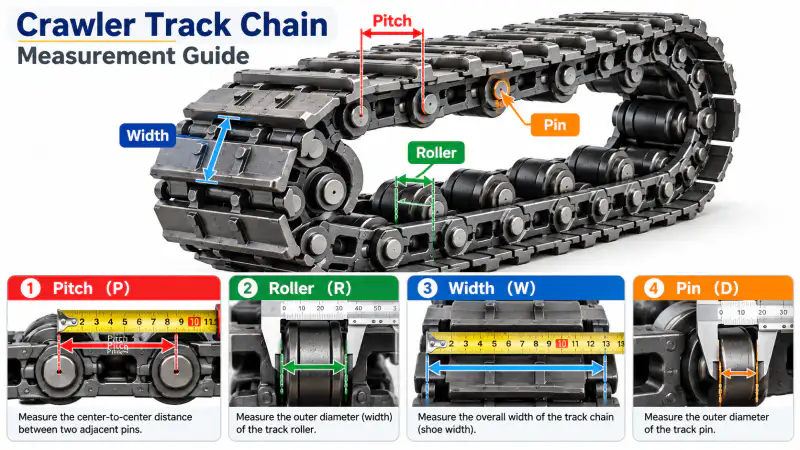
Эффективный процесс замены начинается с определения выполняемой цепью работы и имеющихся на месте установки доказательств. Ниже представлены этапы, описывающие алгоритм принятия решений. Они не предполагают взаимозаменяемости любых двух неизмеренных компонентов.
Clean The Measurement Points
Mud, scale and heavily worn corners can conceal the true centre of a pin. Clean enough surface to identify the actual joint axes without unnecessarily dismantling the assembly. If access is poor, state which numbers are approximate.
Measure Across Several Pitches
A single link may have elongated joint clearance. Measure over several equal pitch intervals, divide the span by the interval count and compare with one or two isolated pitches. The average is a screening measurement, not a substitute for a product drawing.
На этом этапе задокументируйте исходное состояние и точное измерение или наблюдение, использованное для принятия решения. Если деталь уже снята, покажите, где она была установлена, сфотографировав соседние компоненты. Сохраните идентификатор фотографии рядом с измеренным значением, чтобы его можно было проверить позже.
Measure Joint Components
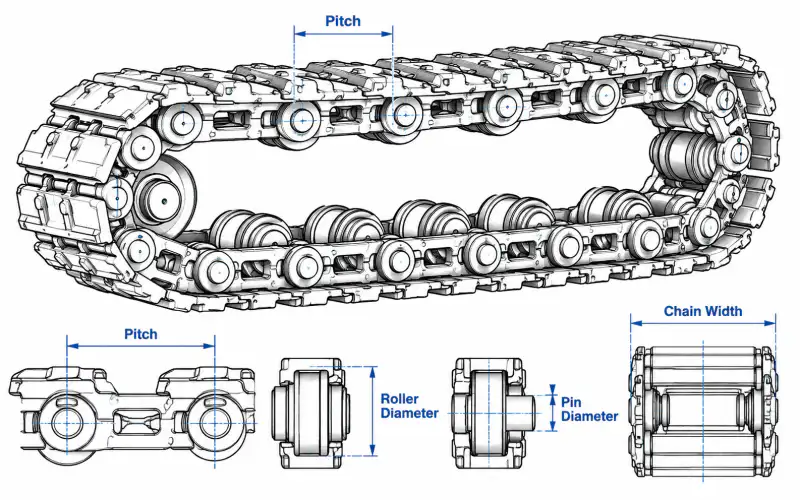
Record pin outside diameter, roller outside diameter, roller working width and inside link clearance where visible. Measure at more than one angular position when wear is uneven and do not assume a worn diameter equals the nominal manufactured size.
A supplier reviewing measure joint components must know whether the figure is nominal drawing data, field measurement, or an estimate from a worn component. That distinction changes what can be quoted without a sample and what needs an additional dimensional inspection.
Check The Attachment Pattern
Plate or cleat mounting holes form a second repeat pattern. Mark hole diameters, centre-to-centre distances, lateral offset and orientation. A matching main-chain pitch does not correct a different attachment layout.
На этом этапе задокументируйте исходное состояние и точное измерение или наблюдение, использованное для принятия решения. Если деталь уже снята, покажите, где она была установлена, сфотографировав соседние компоненты. Сохраните идентификатор фотографии рядом с измеренным значением, чтобы его можно было проверить позже.
Send A Clear Dimensional Set
Provide a dimensioned photo, a legible sketch and the original machine identification. Include the number of links in the complete circuit if available, plus the sprocket photograph and operating environment.
Контрольный список данных запроса
| Мнение покупателя | Причина для подтверждения |
|---|---|
| Машинный контекст | Фактическая функция цепи, место установки, модель оборудования (если известна). |
| Размеры цепи | Шаг стыков по нескольким соединениям, ширина и опорные размеры стыков. |
| Интерфейс крепления | Места крепления, расположение отверстий и взаимосвязь звездочек. |
| Контекст обслуживания | Рабочая среда, воздействие абразивного материала и признаки износа |
| Файлы | Эскиз с замерами, фотографии установленной детали, артикул, количество. |
Решения, требующие проверки
Для соответствия фактической заказанной конфигурации необходимо подтвердить габариты, марку материала, термообработку, допустимую рабочую нагрузку и любые ссылки на заменяемые детали. Общая геометрия цепи может служить для предварительной идентификации, но сама по себе не гарантирует замену.
Даже если известен номинальный шаг цепи, осмотрите сопрягаемый узел. Ремонт, восстанавливающий одно соединение, но оставляющий сильно изношенные зубья звездочки или деформированные кронштейны без изменений, может не устранить основную неисправность. Различайте немедленные ремонтные работы и решение о полной замене системы.
Рабочий процесс технической проверки
- Определите функцию машины и какой компонент рассматривается.
- Зафиксируйте измеренные геометрические параметры с помощью фотографий и единиц измерения.
- Проверьте сопряженную цепь, звездочку и место крепления.
- Укажите точный объем и количество заменяемых деталей.
- Отправьте эскиз и фотографии для проверки конфигурации.
Часто задаваемые вопросы
Что делать, если отсутствует оригинальный номер детали?
Используйте схемы установки оборудования, образец цепи с замерами, фотографии соединительных компонентов и описание выполняемой задачи.
Достаточно ли совпадения предложений для размещения заказа?
Нет. Форма соединения, ширина, геометрия роликов, смещение при монтаже и зацепление звездочки могут отличаться при одном и том же номинальном шаге.
Можно ли использовать размеры изношенной детали?
Да, это предварительная отправная точка, но значительные следы износа необходимо задокументировать и, по возможности, сравнить с неношеным экземпляром.
Как эффективно рассмотреть технический запрос?
Предоставьте описание самого приложения, фотографии в масштабе, разборчивый эскиз, количество ссылок, детали интерфейса и их количество.
Prepare The Part For Measurement
Clean the accessible chain surface enough to identify joint centers without altering the part. Keep the machine in its documented safe maintenance condition before reaching around sprockets or undercarriage components. Mark one starting joint and count several consecutive pitches along a relatively straight section. A digital caliper may work for accessible small features, while a suitable rule or tape can be more practical over multiple large links. Record the measuring tool and unit system. Photograph the scale directly alongside the joint so another reviewer can see what was measured.
Choose Multiple Pitch Samples
An isolated pin-to-pin reading on a worn chain can be distorted by surface wear, pin clearance or a tilted measuring tool. Measuring across several consecutive joints helps reveal whether one local joint is damaged or the entire strand has elongated. Note the number of intervals between the first and last marked joint, and keep those marks visible in a companion photo. If the chain is highly curved around a wheel, record that fact and move to a straight section for comparison where safe. Do not treat a field value as a nominal drawing tolerance.
Document Widths Separately
Inside width, outside width, roller or bush width and attachment spacing describe different features. Measure each from the correct datum and label the result so it cannot be mistaken for overall chain width. If two chains run parallel beneath a wide track, distinguish the spacing between strands from the width of an individual link. Include a side elevation for vertical offsets and a top view for hole positions. Avoid taking several numbers without a sketch: unlabelled values are difficult to translate into a manufacturing drawing later.
Handle Wear And Deformation
Take an additional measurement on an adjacent link that appears less damaged when possible. An oval pin hole, bent plate or flattened roller may no longer represent the intended manufactured profile. Report the measured condition honestly and identify what surface was used as the reference. If the original manufacturer drawing is unavailable, submit more views rather than guessing a standard code. Engineering review can then separate information suitable for identification from dimensions that require a fresh part or controlled sample.
Check The Installed Envelope
After recording nominal-looking dimensions, inspect the space the chain occupies during travel. Note nearby guards, guide rails, mounting brackets and any narrow turning radius. The allowable assembly width may be controlled by one local region rather than by the open straight run. Photograph the existing sprocket from the front and side, and show how the roller or link enters the tooth gap. A part with similar pitch may still fail on a different roller diameter or mounting offset. Include the envelope drawing with the chain dimensions.
Make The Drawing Actionable
A useful sketch has a clear title, units, orientation arrows, dimensions, photo references and an explicit list of unknown values. Separate the count of links from the overall circuit length. Mark whether the quantity requested represents one loose link, a joined strand or a pair of chains. Submit the sketch with at least one close-up image and one image showing the chain in the machine. This gives the manufacturer enough context to respond with targeted questions instead of interpreting unlabeled numbers.
Следующий шаг
Используйте руководства по измерениям и страницы, посвященные семействам продуктов, вместе. Четкая запись запросов помогает технической команде выявлять неопределенности до того, как решение о замене станет дорогостоящим.
Просмотреть семейства продуктов Отправить технические характеристики