
Photograph the correct features so an engineering enquiry can be reviewed without repeated clarification.
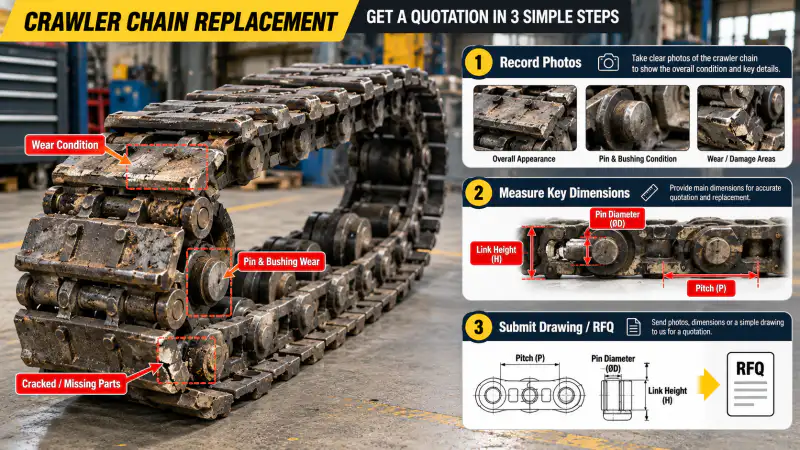
Sağlam bir değiştirme süreci, zincirin gerçekleştirdiği işi ve kurulumda mevcut olan kanıtları belirleyerek başlar. Aşağıdaki adımlar bir karar iş akışı olarak sunulmuştur. Ölçülmemiş herhangi iki bileşenin birbirinin yerine geçebileceği varsayımı yapılmamıştır.
Start With An Overall View
Show the complete machine and circle the chain that requires replacement. Include whether it is a pontoon travel chain, general crawler chain or another mechanism.
Capture The Straight Run
Use a square-on side view of several adjacent links and a scale in the same plane. This shows repeat pitch, side profiles and attachment pattern better than an isolated dramatic close-up.
Bu adımda, önceki durumu ve kararı vermek için kullanılan kesin ölçümü veya gözlemi belgeleyin. Parça zaten çıkarılmışsa, bitişik bileşenlerin fotoğraflarını çekerek nereye takıldığını gösterin. Daha sonra kontrol edilebilmesi için fotoğraf tanımlayıcısını ölçülen değerin yanına koyun.
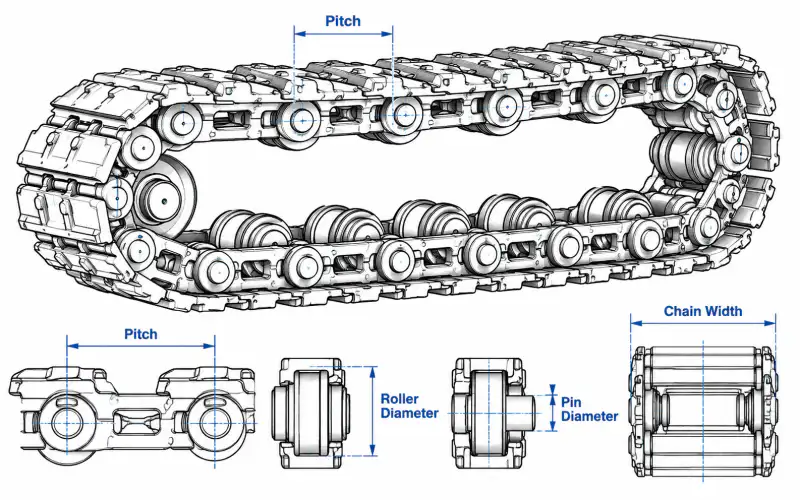
Record The Joint End
Photograph the end view so pin retention, lateral spacers, rollers and the inner width are visible. Avoid shadows that hide the bore and the link-to-link overlap.
A supplier reviewing record the joint end must know whether the figure is nominal drawing data, field measurement, or an estimate from a worn component. That distinction changes what can be quoted without a sample and what needs an additional dimensional inspection.
Show The Mating Components
Include the drive sprocket, idler and any track plates or cleats. A new strand may not run correctly on severely worn mating components.
Bu adımda, önceki durumu ve kararı vermek için kullanılan kesin ölçümü veya gözlemi belgeleyin. Parça zaten çıkarılmışsa, bitişik bileşenlerin fotoğraflarını çekerek nereye takıldığını gösterin. Daha sonra kontrol edilebilmesi için fotoğraf tanımlayıcısını ölçülen değerin yanına koyun.
Attach The Right File Types
A CAD export, PDF sketch, original part drawing, and clearly numbered photos can be uploaded alongside the quantity and destination. Redact confidential customer markings when necessary.
Sorgulama Veri Kontrol Listesi
| Alıcı girdisi | Onaylama nedeni |
|---|---|
| Makine bağlamı | Zincirin gerçek işlevi, kurulum konumu, biliniyorsa ekipman modeli. |
| Zincir boyutları | Birden fazla bağlantı noktasındaki adım aralığı, genişlik ve bağlantı noktası referans boyutları |
| Montaj arayüzü | Bağlantı noktaları, delik deseni ve dişli çark ilişkisi |
| Hizmet bağlamı | Çalışma ortamı, aşınmaya maruz kalma ve yıpranma belirtileri |
| Dosyalar | Ölçülü çizim, montaj fotoğrafları, parça referansı, miktar |
Doğrulama Gerektiren Kararlar
Üretim boyutları, malzeme kalitesi, ısıl işlem, izin verilen çalışma yükü ve varsa yedek parça referansı, sipariş edilen gerçek konfigürasyon için teyit edilmelidir. Genel zincir geometrisi ön tanımlamaya yardımcı olabilir ancak tek başına garantili bir yedek parça sağlayamaz.
Nominal zincir adımı bilinse bile, bağlantı tertibatını inceleyin. Bir bağlantıyı onaran ancak ciddi şekilde aşınmış dişli çark dişlerini veya deforme olmuş braketleri değiştirmeden bırakan bir onarım, altta yatan arızayı gidermeyebilir. Acil bakım çalışmalarını, komple sistem değiştirme kararından ayırt edin.
Teknik İnceleme İş Akışı
- Makinenin işlevini ve hangi bileşenden bahsedildiğini belirleyin.
- Ölçülen geometriyi fotoğraflar ve birimlerle kaydedin.
- Dişli zincirini, dişli çarkı ve bağlantı arayüzünü kontrol edin.
- Değiştirme işleminin kapsamını ve miktarını tam olarak belirleyin.
- Konfigürasyon incelemesi için çizimi ve fotoğrafları gönderin.
Sıkça Sorulan Sorular
Orijinal parça numarası eksikse ne olacak?
Kurulum aşamasındaki makine görüntülerini, ölçülmüş bir zincir örneğini, bağlantı parçalarının fotoğraflarını ve görev tanımını kullanın.
Fiyatın uygun olması sipariş vermek için yeterli mi?
Hayır. Aynı nominal hatvede bile mafsal şekli, genişliği, makara geometrisi, montaj ofseti ve dişli çark bağlantısı farklılık gösterebilir.
Aşınmış bir parçanın ölçüleri kullanılabilir mi?
Evet, geçici bir başlangıç noktası olarak kabul edilebilir, ancak önemli aşınmalar belgelenmeli ve mümkünse aşınmamış bir referansla karşılaştırılmalıdır.
Teknik bir soruşturma nasıl verimli bir şekilde incelenebilir?
Lütfen gerçek uygulamayı, ölçekli fotoğrafları, okunabilir çizimi, bağlantı sayısını, arayüz detaylarını ve miktarını sağlayın.
Make A Machine-Level View
Start with one photograph that identifies where the chain sits within the machine. Show enough surroundings to distinguish a travelling undercarriage from a conveyor or separate drive train. Include direction of motion and which side of the machine is shown. Take the picture from a safe distance under an approved maintenance procedure. A close-up alone often loses orientation and can lead to a part being quoted for the wrong mechanism. Avoid relying on manufacturer stickers or worn labels when the visible geometry can be documented more clearly.
Capture Both Chain Faces
Photograph the outer and inner faces of the chain at a straight section. Include the joint, its retention feature and a few neighboring links. Place a measuring rule in the plane being recorded rather than far in front of the part. Take a separate side view for thickness and offsets. Where attachments are present, show how they connect to the chain and what they carry. If access is limited, note the obstruction instead of hiding it in a cropped image. Never operate the equipment to obtain a photo unless the safety plan explicitly allows it.
Reveal Hidden Interfaces
A connecting pin may be retained by a component that is not visible in the main product photograph. Photograph each end of the pin, any spacer arrangement and the mating bracket. If the enquiry involves a track plate, show the underside, mounting holes and adjacent supports. For sprockets, obtain a front tooth view and a profile view including the hub. These specific images answer different engineering questions. Label the file names with component position, not just arbitrary numbers, so the technical reviewer can compare them without guessing.
Include Measured References
A readable sketch should accompany the photo set. Mark joint centers, overall widths, hole locations and any worn region. Use consistent units, and record which dimensions were taken from the actual machine rather than inferred from a product reference image. If a sample link is removed, keep track of its original orientation and the chain side. Photos support identification, but they rarely establish nominal tolerances. Preserve any original drawing or part number even if it is uncertain, and explain why it may no longer match the field condition.
Name The Repair Scope
Before requesting a price, say whether you need a complete strand, a section of chain, single links, attachment hardware or matched sprockets. Count units using a clear naming convention; the word piece can mean very different things for pins and assembled chains. If a shutdown date matters, provide it as a planning constraint without assuming any unquoted delivery promise. Note destination, packaging preferences and any export documentation needed. These details allow the supplier to distinguish a technical feasibility review from a firm purchase order.
Avoid Common Photo Errors
Blurry close-ups, reflective glare, missing scales and photos taken from only one side slow down identification. A single angle can hide holes or offset shoulders, while a photograph of a dirty worn joint can conceal retention hardware. Prefer fewer clearly labelled, high-resolution images over a large unsorted set. Keep the original image files so that technical staff can zoom in without introducing artificial details through aggressive enhancement. Where an important feature cannot be photographed safely, explain the access limitation and use an approved drawing instead.
Sonraki Adım
Ölçüm kılavuzlarını ve ürün ailesi sayfalarını birlikte kullanın. Açık ve net bir sorgulama kaydı, teknik ekibin, değiştirme kararı maliyetli hale gelmeden önce belirsizliği belirlemesine yardımcı olur.