Photograph the correct features so an engineering enquiry can be reviewed without repeated clarification.
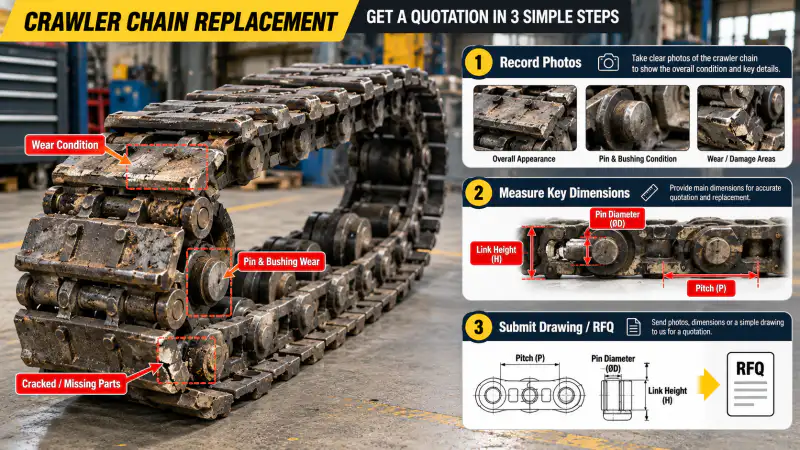
A sound replacement process starts by identifying the work the chain performs and the evidence available at the installation. The steps below are presented as a decision workflow. They do not assume that any two unmeasured components are interchangeable.
Start With An Overall View
Show the complete machine and circle the chain that requires replacement. Include whether it is a pontoon travel chain, general crawler chain or another mechanism.
Capture The Straight Run
Use a square-on side view of several adjacent links and a scale in the same plane. This shows repeat pitch, side profiles and attachment pattern better than an isolated dramatic close-up.
For this step, document the before-condition and the exact measurement or observation used to make the decision. If the part is already removed, show where it fitted by photographing adjacent components. Keep the photo identifier next to the measured value so it can be checked later.
Record The Joint End
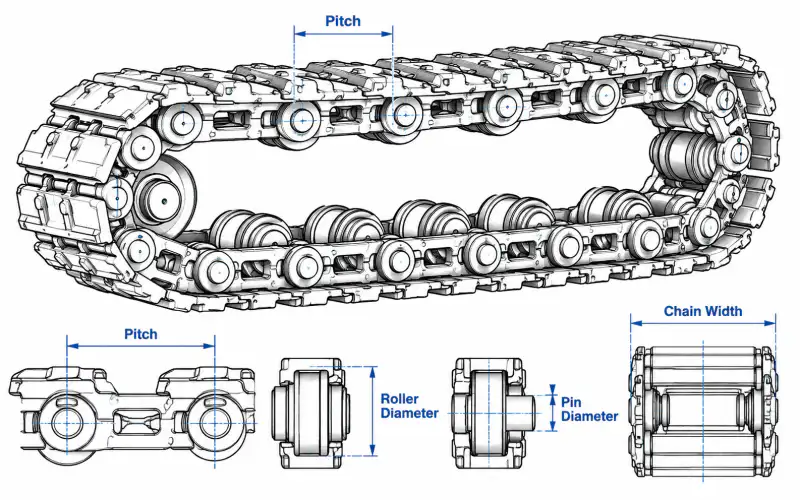
Photograph the end view so pin retention, lateral spacers, rollers and the inner width are visible. Avoid shadows that hide the bore and the link-to-link overlap.
A supplier reviewing record the joint end must know whether the figure is nominal drawing data, field measurement, or an estimate from a worn component. That distinction changes what can be quoted without a sample and what needs an additional dimensional inspection.
Show The Mating Components
Include the drive sprocket, idler and any track plates or cleats. A new strand may not run correctly on severely worn mating components.
For this step, document the before-condition and the exact measurement or observation used to make the decision. If the part is already removed, show where it fitted by photographing adjacent components. Keep the photo identifier next to the measured value so it can be checked later.
Attach The Right File Types
A CAD export, PDF sketch, original part drawing, and clearly numbered photos can be uploaded alongside the quantity and destination. Redact confidential customer markings when necessary.
Enquiry Data Checklist
| Buyer input | Reason to confirm |
|---|---|
| Machine context | Actual chain function, installation position, equipment model if known |
| Chain dimensions | Pitch across multiple joints, width and joint reference dimensions |
| Mounting interface | Attachment locations, hole pattern and sprocket relationship |
| Service context | Working medium, abrasion exposure and wear symptoms |
| Files | Measured sketch, installed photos, part reference, quantity |
Decisions That Require Verification
Manufacturing dimensions, material grade, heat treatment, permissible operating load and any substitute part reference have to be confirmed for the real ordered configuration. General chain geometry can support preliminary identification but cannot establish a guaranteed replacement by itself.
Even when a nominal chain pitch is known, examine the mating assembly. A repair that restores one joint but leaves severely worn sprocket teeth or distorted brackets unchanged may not address the underlying fault. Distinguish immediate maintenance work from a complete system replacement decision.
Technical Review Workflow
- Identify the machine function and which component is being discussed.
- Record the measured geometry with photographs and units.
- Check the mating chain, sprocket and attachment interface.
- Define the exact replacement scope and quantity.
- Submit the sketch and photos for configuration review.
Common Questions
What if the original part number is missing?
Use installed-machine views, a measured chain sample, photographs of the connecting components and a description of the duty.
Is a matching pitch enough to place an order?
No. Joint shape, width, roller geometry, mounting offset and sprocket engagement can differ at the same nominal pitch.
Can dimensions from a worn component be used?
Yes as a provisional starting point, but significant wear must be documented and compared with an unworn reference when possible.
How can a technical enquiry be reviewed efficiently?
Supply the actual application, photos with scale, readable sketch, link count, interface details and quantity.
Make A Machine-Level View
Start with one photograph that identifies where the chain sits within the machine. Show enough surroundings to distinguish a travelling undercarriage from a conveyor or separate drive train. Include direction of motion and which side of the machine is shown. Take the picture from a safe distance under an approved maintenance procedure. A close-up alone often loses orientation and can lead to a part being quoted for the wrong mechanism. Avoid relying on manufacturer stickers or worn labels when the visible geometry can be documented more clearly.
Capture Both Chain Faces
Photograph the outer and inner faces of the chain at a straight section. Include the joint, its retention feature and a few neighboring links. Place a measuring rule in the plane being recorded rather than far in front of the part. Take a separate side view for thickness and offsets. Where attachments are present, show how they connect to the chain and what they carry. If access is limited, note the obstruction instead of hiding it in a cropped image. Never operate the equipment to obtain a photo unless the safety plan explicitly allows it.
Reveal Hidden Interfaces
A connecting pin may be retained by a component that is not visible in the main product photograph. Photograph each end of the pin, any spacer arrangement and the mating bracket. If the enquiry involves a track plate, show the underside, mounting holes and adjacent supports. For sprockets, obtain a front tooth view and a profile view including the hub. These specific images answer different engineering questions. Label the file names with component position, not just arbitrary numbers, so the technical reviewer can compare them without guessing.
Include Measured References
A readable sketch should accompany the photo set. Mark joint centers, overall widths, hole locations and any worn region. Use consistent units, and record which dimensions were taken from the actual machine rather than inferred from a product reference image. If a sample link is removed, keep track of its original orientation and the chain side. Photos support identification, but they rarely establish nominal tolerances. Preserve any original drawing or part number even if it is uncertain, and explain why it may no longer match the field condition.
Name The Repair Scope
Before requesting a price, say whether you need a complete strand, a section of chain, single links, attachment hardware or matched sprockets. Count units using a clear naming convention; the word piece can mean very different things for pins and assembled chains. If a shutdown date matters, provide it as a planning constraint without assuming any unquoted delivery promise. Note destination, packaging preferences and any export documentation needed. These details allow the supplier to distinguish a technical feasibility review from a firm purchase order.
Avoid Common Photo Errors
Blurry close-ups, reflective glare, missing scales and photos taken from only one side slow down identification. A single angle can hide holes or offset shoulders, while a photograph of a dirty worn joint can conceal retention hardware. Prefer fewer clearly labelled, high-resolution images over a large unsorted set. Keep the original image files so that technical staff can zoom in without introducing artificial details through aggressive enhancement. Where an important feature cannot be photographed safely, explain the access limitation and use an approved drawing instead.
Next Step
Use the measurement guides and product-family pages together. A clear enquiry record helps the technical team identify uncertainty before a replacement decision becomes expensive.